New food adventure: Birria Tacos!

Tags

,

Droolworthy videos and images of birria tacos and quesabirria from California and Texas have been all over my social media (check out the hashtag #birria or #quesabirria on Instagram or TikTok), and making me incredibly jealous.

I hadn’t had a chance to try them at La Tiendita (amazing Tallahassee restaurant), and I knew I could get most of the ingredients locally – I did have to order the dried Anaheims online, but Publix had the guajillo chiles, chipotle in adobo and whole spices, and Whole Foods had the Oaxaca cheese – so it was on. (You can sub a block of high-quality mozzarella for the Oaxaca cheese though.)

Obviously my German ancestors had no guidance on this recipe so I consulted the talented abuelas, madres, tías and hermanas of the internet and watched countless videos on YouTube and IG.

Some base recipes that I consulted for amounts and techniques:
https://www.mylatinatable.com/authentic-mexican-birria-recipe/
https://hispanickitchen.com/recipes/birria-style-stewed-pork/

As you can see there are a variety of ingredient differences throughout the recipes, so you can pick and choose the spices /chiles depending on your preference and their availability. I would also use some fresh peppers such as poblano or jalapeno next time to increase the heat. I used more garlic than most recipes because I looooove it.

Highly recommend getting all ingredients out and organized by stage before beginning. Go ahead and snip tops off of the chiles and discard seeds. I used 4 guajillo and 4 dried anaheim peppers (chile california). I didn’t end up using the Rotel because I had fresh tomatoes that needed to be used.

Slice pork or beef into thick slices and season with salt, pepper, garlic powder and cumin. Heat dutch oven with neutral oil covering the bottom. Sear pork or beef in batches until each piece has a dark golden crust, and remove to bowl.

Toast chiles in same dutch oven until a little darker, remove, and put in blender container with some hot water to steep and soften (don’t blend yet).

I added onions (thick slices), four tomatoes cut in half to dutch oven with some salt and pepper, keep stirring so the bottom doesn’t burn. Then add ground/whole spices and garlic cloves, stir until fragrant.

Add a little chicken stock and scrape the bits up and then add everything in the dutch oven to the peppers in the blender with apple cider vinegar, pinches of ginger/cumin/salt, and a chipotle pepper (can add more for additional spice) and blend until as smooth as you can get it.

Take out the lid insert and cover with a paper towel and dish towel while blending hot liquid so that steam can escape and you don’t burn your hand AND you don’t have an explosion.

Add pork back to pot, strain blended sauce over meat, add remaining chicken stock and some water to make sure that the liquid covers the meat) and then stir in a couple tbsps of beef bouillon ( I use the “Better Than Bouillon” brand). Bring to boil, then simmer for two hours sealed with foil and lid.

Pork should be shreddable at this point; if not, cook for another 20 min. Remove pork to separate bowl, shred, and add some juice to the meat to keep it from drying out. Cover with foil to keep warm. I put the bowl on the back of the range to make it easy to access when building the tacos.

Preheat griddle or skillet, add oil right before use. Bring liquid to a boil and reduce a bit while chopping onions and cilantro, prepping lime wedges, and shredding cheese. Taste sauce to see if you need additional salt. Turn off heat so that fat settles on top for the tortilla dipping.

To assemble: dip corn tortillas in liquid, put on preheated and oiled griddle/skillet, top with cheese and meat, fold and toast. Can add garnish before or after folding.

Put juice in cups for each diner topped with onion and cilantro for dipping. Serve with lime wedge.

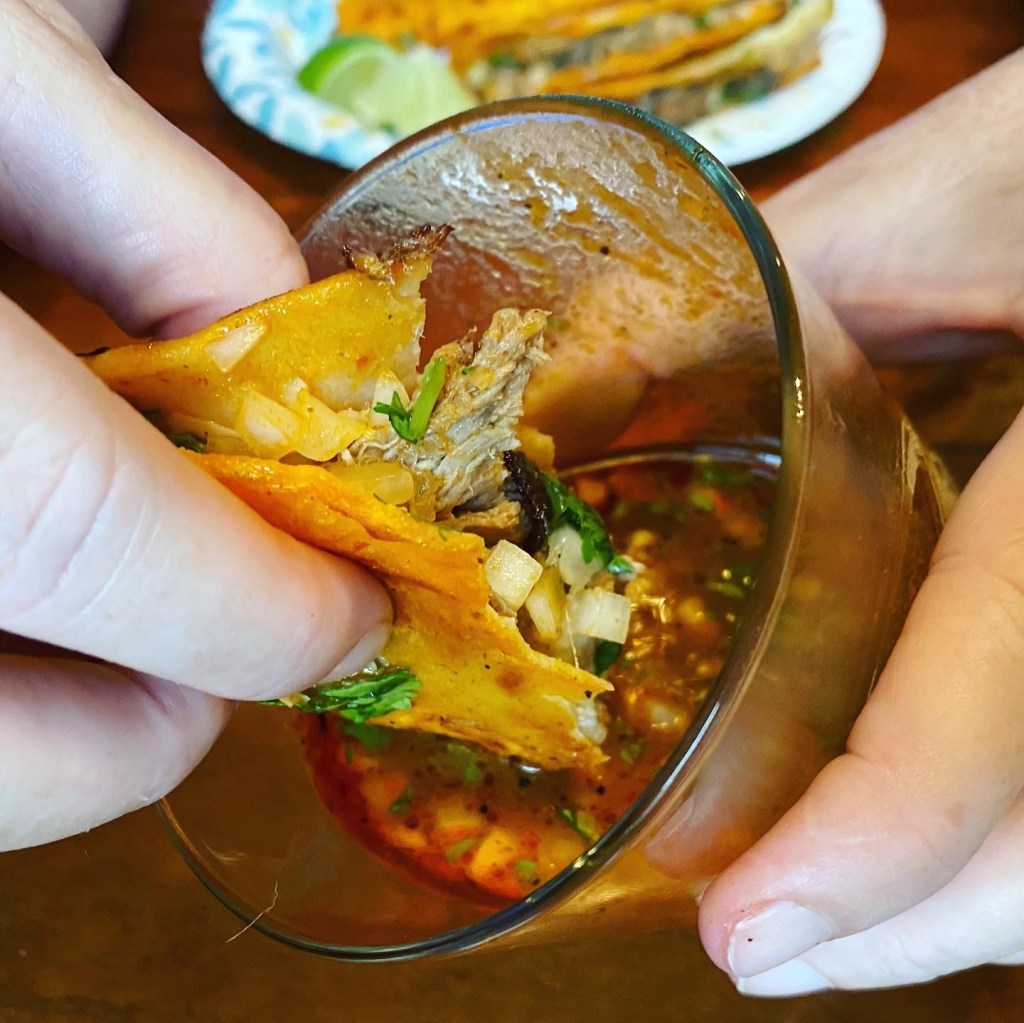
These vaulted to the top of the “best dishes I have ever cooked” list according to the teenagers and spouse, so I’m thinking we will be having this regularly. I honestly may freeze some of the remaining liquid just so I can have impromptu birria tacos in the future.

Date Night at Il Lusso

Tags

, , , ,

New to the Tallahassee scene is a Northern Italian steakhouse called Il Lusso.  This is a welcome addition to the fine dining options for the metro area, and a fantastic add to the downtown area.

Il Lusso Outside

Bright and airy, the details of the interior really provide the feeling of being in a much bigger city while retaining enough warmth to keep it from seeming too industrial. Wood floors are balanced with marble tile sections and cozy couches are in the waiting area.

Il Lusso interior

The bar was well-staffed and had some lovely custom cocktails. I got the Lavender Bliss (with vodka instead of the gin), and although pretty strong – it was tasty.

Il Lusso Lavender

The menu has a great selection of starters, and the entrees are focused on high-steaks and fresh pastas, with options for seafood, chicken or vegetarian entrees.

We began with the Blue Crab Arancini and a Caesar Salad (super sad that they were out of the Sweetbread starter, which looked delicious.) BUT the arancini were heavenly. I can’t tell you what was in the squid ink sauce but it was scrumptious. The caesar salad had a perfectly executed traditional dressing with toasted croutons.

Il Lusso Caesar
Il Lusso Blue Crab Aracini

The a la carte sides looked exceptional, making it hard to choose, but we settled on the cauliflower with anchovy, parsley and lemon, and the rosemary potatoes with fondue sauce. The cauliflower was nicely charred although I could have used more of the flavorings (more anchovy and lemon please!). The potatoes had great herby flavor and the taleggio sauce provided a good balance.

Il Lusso Cauliflower

Il Lusso Rosemary Potatoes

As a splurge, we got the 24 oz (!) Prime Dry-Aged Cowboy Ribeye to share and a small portion of the Lamb Ragu Malfadine (ruffled noodle). Very pleased to see the option of small and large dishes of the pastas so that we could sample one.

First, the pasta was one of my favorites of the night. With a deconstructed lasagna vibe, the ragu was flavorful and rich and the pasta was a perfect al dente.

Il Lusso Lamb Ragu

And for the star of the show, here is the ribeye…perfectly cooked and the aging gave it a pleasant tang of flavor (reminiscent of parmagiano reggiano.)

Il Lusso Dry-aged Cowboy Ribeye

Conclusion: This is a great fine dining option, but with the cost (well justified with the quality of the ingredients and the location), but I am looking forward to trying the lunch menu so that I can eat there more often. (They have also hinted about brunch coming soon!) Either way, we will definitely be going back.

Restaurant Info:

Il Lusso
201 E. Park Avenue
Tallahassee, Florida

Tel — 850-765-8620
Reservations — OpenTable
Follow — Instagram / Facebook

Make Your Own Fancy Burger Blends (It’s worth it.)


May is apparently Burger Month, which honestly, isn’t every month burger month? But I figured it was the perfect time to share how I make my “fancy” burgers.

Years ago I found several articles that showed how easy it was to make custom burger blends at home, and once I tried it, I was hooked.

The advantages to the custom burger mix are: less compressed meat, better texture (less heavy/dense), more flavor, and increased confidence in the quality of the cuts used.

My general formula is basically a 2-1-1 with chuck roast as the main meat represented (solid flavor + fat) plus two other lower fat-high flavor cuts. For this time, I used chuck, brisket and ribeye, but I have also used short ribs or flank steak for the smaller cuts.


img_9723-1

I trim the steaks of gristle and silverskin, cut into roughly 1-1.5 inch cubes, and freeze for at least an half an hour. I keep the cuts separate so I can evenly distribute them in the food processor. You can also add frozen cubes of butter or bacon fat, if you want to bump up the fat content a bit.

img_9726-1

Then comes the fun part, which is pulsing the meat in batches (with proportional handfuls of each cut) in the food processor for a medium-fine grind.

Gently form the patties, you won’t need to indent the top because these don’t constrict as much as store-bought hamburger meat. Salt and pepper the patties generously and refrigerate until ready to cook.

img_9732-1

I am a fan of charcoal or griddle for cooking these, you can’t go wrong with either method. I would advise cooking medium rare, especially since you have processed them yourself, but they will be juicy even a bit past medium. Add melty cheese, grilled or griddled buttered buns (potato or Publix bakery hamburger buns are amazing) and your favorite condiments and you are ready to go.

(Tip: Make extra and freeze the rest as patties for your future burger emergencies!)

img_9741-1

Full background:
The Burger Lab: Mastering the Art of Burger Blending with Eight Cuts of Beef

Recipe:
The Blue Label Burger Blend Recipe

Other great resources:
They Came, I Ground, We Ate – The Paupered Chef
The Complete Guide to Burger Blends – First We Feast

Special to the Forks: Greek Festival Recipes!

Super excited to tell you guys about working with the dedicated people behind the iconic Greek Festival in Tallahassee. They wanted to show you how some of the most notable dishes are made and share the recipes so that you can enjoy Greek food all year long! (Not just October 6th and 7th at the Holy Mother of God Greek Orthodox Church, which you should absolutely not miss!!)

I was honored to host them in my kitchen as they made me Greek food. (The sacrifices I make for you people, lol.)

Take a look!

Spanakopita (Greek Spinach Pie)

1 tablespoon of olive oil
2 pounds spinach
1 bunch of leeks or scallions sliced
Salt and pepper to taste
1 to 2 beaten eggs
½ to 1 pound of feta cheese, crumbled
1 to 2 sticks of butter for brushing phyllo
1 pound phyllo dough

Saute 2 pounds of spinach and sliced leeks or scallions, until spinach is wilted. Add salt and pepper to taste. Remove mixture from heat.

Let mixture cool. Preheat oven to 350 degrees. Add egg and feta cheese to the cooled mixture. Combine.

Melt 1 to 2 sticks of butter. Unroll phyllo dough, keep covered with a damp towel so it doesn’t dry out and become brittle. Cut phyllo into strips. Layer strips, brushing each layer with loads of melted butter (use as many layers as you like, but at least three, six used here).

Add filling and make triangles. Bake for 30-45 minutes, until golden brown.


Pork Souvlaki

Make the Marinade:
½ cup olive oil
Juice of one lemon, more to taste
2 teaspoons oregano
2 garlic cloves minced
Salt and pepper to taste

Whisk together olive oil, lemon, oregano, garlic, and salt and pepper. Cut pork tenderloin into even cubes and add to marinade. Marinate for at least one hour. Add pork to skewers and grill until charred (and 145 degrees internal temperature.)


Tzatziki Sauce 

2 cups Greek yogurt, full fat
1 English cucumber, peeled and grated
1 tablespoon minced dill
2 tablespoons minced garlic
2 tablespoons lemon juice
Zest of half a lemon
Salt and pepper to taste
1-2 tablespoons olive oil

Whisk together Greek yogurt, cucumber, garlic, lemon juice, dill, salt and pepper, and olive oil. Add zest of half a  lemon to taste. Enjoy with souvlaki and pita bread (recipe here).

Journey to Making Bacon 

Do you love bacon? Have you ever had non-grocery store bacon? (If yes, then YOU KNOW.)

Home cured and smoked bacon is so good, and for someone that loves to learn the nuances of my favorite foods, making bacon from scratch was really fun. For one, it’s easy, with very small amounts of active cooking time. Most is just waiting for the cure to finish and then waiting for it to smoke. For two, it’s delicious – much less wet (for lack of a better word) than store-bought. You also have the flexibility of slicing it as thin or as thick as you want.

First: Recipe!

You will need to get pink nitrate from Amazon, but the rest of the ingredients are simple. I used a combo of the maple bacon recipe Ruhlman’s Charcuterie (pictured below) and the one from AmazingRibs.com . The linked recipe from Ruhlman has a lot more stuff than the book version, but his technique was my home base.

IMG_1566 2

I combined the sugar, salt, nitrate, brown sugar, cayenne, black pepper and maple syrup, then just slather on the pork belly. Put it in a bag and wait seven days for the cure to fully penetrate the meat (flipping once a day.)

For some versions, I used sorghum syrup (similar to molasses) and varied the amount of spice via red pepper flakes and cayenne. The sorghum definitely added a deeper flavor and color, it was a nice variant, but I’m partial to the maple flavor.

In the first version I made, I just stuck the belly on the smoker after curing, but it didn’t have enough extra oomph on the outside. For subsequent versions, I sprinkled raw sugar, cayenne and black pepper on the pork belly before smoking.

So pretty, right!?!?

Then you smoke for three hours at 225 degrees or until the internal temp hits 150 degrees. (I took the skin off after smoking and froze it to use later for greens or soups.) I used applewood chunks for a mild, fruit smoke flavor.

img_8379

Then slice and cook! I recommend baking the sliced bacon so the sugar doesn’t brown too fast, and if you need to crisp it up, you can throw it in a sautè pan at the end to finish it.

Tip for slicing: freeze for five or ten minutes before slicing if you would like thinner slices.

Second: Results!

img_8568-1

It’s so good, y’all. And honestly straight-forward to do once you have the ingredients. You should be able to get pork belly at your grocery (you may need to request it) or local butcher shop. If not, it can be ordered online.

The payoff is worth it.

img_8516-1


French Fry Corndog? Challenge accepted.

As a fan of Madison Social (especially their brunch), I’ve been curious about their new restaurant Township, whose menu seems to be perfect “gastropub” drinking food, honestly. Meats on a stick? Check! Salty breads with cheese dip? Check!

I knew I needed to make a plan to visit when they posted a pic of the most ridiculous hot dog, crusted in french fries and topped with beer cheese and Sriracha.

Township is located right across the street from MadSo, and also looks out on the FSU Intramural Fields and Doak Campbell Stadium. It is a great space with high ceilings and a very relaxed atmosphere. The menu is straight forward, divided in the categories of Cones, Bowls, Sticks, Buns and Feasts.

img_8202

For the beer lovers, the selection was widely varied and had some intriguing options.

I was able to sit for a minute in the garden area, waiting for my friend. So relaxing!

Thank goodness I could recruit @wakullawriter to assist me in sampling the menu. Below is the Mac N Beer Cheese Cone and the Shrimp Ceviche Tacos. Both delicious.

My fave was the Pork Belly Bites Cone, each bite had a lovely, caramelized glaze and were perfectly cooked (where they weren’t too fatty.) The bites were topped with a fresh and spicy kimchi.

And here is the monster…this “corn” dog was delicious. I was surprised that it wasn’t heavier, the potato crust was actually a great complement to the dog.

This was a great lunch, but I need to come back when I can sample the great drinks and hang out for longer.

I am continually jealous of this generation of college students for having such amazing food at their hangouts. (Sorry Guthrie’s!) But glad I can access them now that I can actually afford to have more than just fast food.

Easy Peasy Pita

Tags

Time to see how much making pita bread is! AND I actually remembered to take pictures throughout the process for you. 😉

The recipe I followed for this post was the Serious Eats: Perfect Homemade Pita Bread recipe.

First you add all of the ingredients to your mixer or your food processor (in the processor, I would add the dry ingredients first (pulse) and then add the wet ones.) Or you can do this with just a wooden spoon (like the recipe above.) I really like the combo of the white and wheat flour, but you can use what you have on hand.

Once it comes together, keep the machine going for a couple minutes to “knead” it. Then place the dough in a lightly oiled bowl.

Let rise for an hour or two. I like to put my oven on its lowest setting, and then turn it off before putting the covered bowl in there to rise. It gets nice and puffy. At this point, I put my griddle in the oven and preheat to 500 degrees.

I then separated into fairly equal balls – I weighed the dough and divided by 3 ounces (for each ball.) Cover the balls of dough with a kitchen towel and let them rest.


Then I roll each ball out to a circle. The dough bounces back a little bit, but try and get it pretty thin. Then cover the circles with the towel so that they don’t dry out.

Throwing the circles on the griddle can be a little tricky, but the ugly pita tastes just as good as the pretty pita. Most of them will puff up nicely and give you a lovely pocket for your sandwiches.

Flip and let brown for a couple seconds, and then take out and place with the rest – wrapped in a towel.

So pretty, and they really are delicious. Since they do not have any preservatives, keep them in the fridge if you still have some left after a couple days. You could probably freeze them as well. Happy Pita making!

Off the beaten path, but worth it: Backwoods Crossing

Tags

, , ,

One of my weaknesses is a solid (and verifiable!) farm-to-table restaurant. There are three main challenges with these type of businesses. If they really are farm-direct products, the cost is generally higher. “Farm fresh” doesn’t guarantee good flavor/cooking technique. And it can be very difficult to confirm that the food is from a local farmer.

We needed a good place to take my Dad for his birthday that was out closer to their side of town (East Side!), and I had heard great things about Backwoods Crossing a local “farm-to-table” restaurant. I figured it was a handy occasion to try them out (and to use family to sample more dishes.)

Backwoods Crossing seems to have accomplished the trifecta – verifiable fresh, local food, high quality and reasonable cost. With one garden immediately outside the building, you can see what is ready or harvest, and then those options are directly reflected in the vegetable options and the specials.

To start, the house salad was fresh and simple. The balsamic vinaigrette had a good balance, and the meal started off on a solid note.

Daughter #1 got a sandwich with grilled chicken, apple and brie. Really a lovely combination.

My mom got the fried catfish over stone-ground grits and sautéed greens with corn. This was a huge portion, and straight-up delicious.

Daughter #2 got the Hog in a Henhouse – chicken breast stuffed with pulled pork and fried with a crispy crust over béchamel-sauced broccoli. Holy moly! Another large portion and the chicken was perfectly cooked. I think this was my favorite.

My dad got the Seafood Heaven entree with blackened shrimp and cream cheese/blue crab nuggets over creamy grits. Yum.

Trying to be somewhat health-conscious, I got the seared tuna over roasted brussels sprouts, garden beets and potatoes. )I can’t believe that as an adult I have discovered a love for beets. Who knew?)

img_7898

All of the food was impressive, but even more surprising was that our bill (for six people) was around $100. Really loved this place, and my parents, who live on that side of town, were thrilled.

Backwoods Crossing is on Mahan Drive out by the I-10 exit and is in the building formerly inhabited by Stinky’s Fish Camp (RIP!) across from the Tallahassee Automobile Museum. (You can also find them on Facebook!)

We are already planning our late spring visit so that we can see what’s in their garden.

(And sorry for the weird camera angles, the fam was rushing me and messing up my shots so that they could start digging in!)

Example:

Short Ribs Experiment!

Tags

, , , ,

Per usual, I bought an unfamiliar ingredient and picked out the perfect recipe without reading it through. Short ribs were on sale and they were going to happen, whether the fam wanted them or not.

The recipe I wanted to try was Tom Colicchio’s lovely wine-marinated, slow-braised short ribs (which required marinating overnight in a bath of red wine, herbs and aromatics). Next thought…why not use the sous vide?? Welp, that short ribs recipe instructed a 48(!) hour cook in 180 degree water.

Aha moment! I can cook the ribs sous vide all day in the marinade and then do 1.5 hour braise just in time for dinner. Right? (Here goes nothing.)


First, I seared the ribs at high heat, took them out of the pan, and added the veggies and garlic in the pan. Second, I added a bottle (do it big) of Pinot noir to reduce with the veggies and with added sprigs of thyme.

(In the meantime, I set up the sous vide to preheat to 180 degrees – this takes a good bit of time so I heated up water in the tea kettle – to add to the water bath and speed up the water-heating process.)

I retrieved some chicken stock from the freezer and added it to the wine reduction (now cooling). Then added the ribs to the plastic bag with the wine marinade/cooking liquid, and vacuum-sealed the bag. Once the sous vide was preheated, I added the bag of yumminess and left it in there to cook for 6 hours.

After that, I poured all of the contents in a Dutch oven and put it into a 350 degree oven with the lid ajar for an hour and a half. I grilled the ribs before serving, and reduced the liquid, simmering in the pot, while the ribs were getting roasty and charred on the edges.

The ribs were not “fall apart” tender but were seriously delicious. The leftovers were kept in the liquid for dinner on Monday, and I just poured them in a pan to heat up and further reduce for dinner time.

Oh my.

(WARNING: DO NOT CLICK TO SEE A LARGER VERSION OF THE ABOVE PHOTO. MAY CAUSE DROOLING AND LOSS OF BREATH.)

The combo of Chef Colicchio’s marinade and the combo sous vide/braising cooking technique really paid off. I essentially took a three-day process between the two recipes and shrunk it down to eight hours, with a quality reheat the next day.

I served them over rice, but mashed potatoes or buttered egg noodles would be divine.

A Galette by any other name… (Spoiler! It’s pie 😁)

Does making pie crust from scratch seem daunting? Do pies seem like something just grandmas and competitive soccer moms do?

No! You deserve fresh strawberries glazed in sugar and encased in a flaky, buttery blanket. It can all be yours! (Just with a lot less work than you THINK it will take.)

Living in Florida has many benefits, but the early fruit and other fresh produce is something that is really invaluable. Seeing these beauties inspired me to make a Strawberry Galette for a brunch gathering this weekend. (And galette just means pie, but without the fussy crust.)


Keep in mind that you can buy pie crust from the store, and this would be lovely. But being the slightly overwrought food nerd that I am, I wanted to make the crust myself. I used Smitten Kitchen’s Berry Galette crust and loosely adapted the filling part.

I diced Kerrygold butter and put it in the fridge to chill while I got out the other ingredients. I didn’t have ricotta so I used sour cream. I also have about 25 different salts, so I used a fine grey French salt (close to Fleur de Sel but less expensive).

I find in baking that going a little higher end on key ingredients like butter, vanilla and salt transform something good into something spectacular. (My Toll House chocolate chip cookies have stunned people, not kidding.)

After cutting the cold butter with a pastry cutter into the dry ingredients, you gently fold in cold water and sour cream with a spatula or wood spoon (or your hands!) to make a craggy, ugly ball. Then wrap it in plastic and flatten into a disk. Put it in the fridge for at least an hour and you can use that time to make the filling.

Another tweak I made: I cut up one container of the strawberries and cooked them down with a 1/2 cup of sugar (they were really tart), lemon zest, the cornstarch and a splash of Madagascar vanilla. (Instead of just tossing the uncooked fruit with the other filling ingredients as the original recipe instructs.)


While those strawberries cooled, I sliced about 10 more strawberries and rolled out the crust on parchment paper. I drained some of the cooked strawberries (about a 1/4 cup of juice) and microwaved the resulting strawberry juice with about four tablespoons of sugar to make a glaze. ( I just added sugar until it tasted like a strawberry syrup to be honest.)

The cooked strawberry mush (basically jam) went on the crust first, leaving 2 inches around the edge. Then the raw strawberry slices were added on top in a spiral until covering the fruit. Lastly, I folded the crust over, and glazed the fruit. Last step is brushing the crust with egg wash and sprinkling heavily with sugar (coarse sugar would have worked better, but I was out. )

Bake at 400 degrees for 30 minutes or golden brown.


Look at this monster! This thing smelled like sunshine, Springtime and grandma’s kitchen all wrapped up in one. The parchment paper was a lifesaver, both in the dough rolling process (had to stick it in the fridge when the butter started getting to warm and the crust became unmanageable) and in transferring the finished galette to a serving plate.

She’s so pretty!

Two notes after finishing this little beaut: 1) definitely double or triple the recipe. One of these could serve 4-6 people at most (depending on how small your slices are and how hungry your guests are) and you definitely want leftovers; 2) taste the strawberries to determine how much sugar you need. These strawberries were hella tart and needed A LOT more sugar than the recipe recommended, and it still wasn’t a “sweet” pie.

You can probably tell by the picture, but the crust was sublime, both flaky and tender. Reminded me of a pie crust with smidge of biscuit in buttery texture. This is perfect for dessert, brunch, breakfast or just to celebrate fresh strawberries. (Serve with your favorite vanilla ice cream.)

RECIPE: Berry Galette by Smitten Kitchen