• About

All Out of Forks

~ I fangirl over food and cook a bit

All Out of Forks

Category Archives: Recipes

Journey to Making Bacon 

04 Monday Sep 2017

Posted by AllOutOfForks in Breakfast, meat, Recipes

≈ Leave a comment

Do you love bacon? Have you ever had non-grocery store bacon? (If yes, then YOU KNOW.)

Home cured and smoked bacon is so good, and for someone that loves to learn the nuances of my favorite foods, making bacon from scratch was really fun. For one, it’s easy, with very small amounts of active cooking time. Most is just waiting for the cure to finish and then waiting for it to smoke. For two, it’s delicious – much less wet (for lack of a better word) than store-bought. You also have the flexibility of slicing it as thin or as thick as you want.

First: Recipe!

You will need to get pink nitrate from Amazon, but the rest of the ingredients are simple. I used a combo of the maple bacon recipe Ruhlman’s Charcuterie (pictured below) and the one from AmazingRibs.com . The linked recipe from Ruhlman has a lot more stuff than the book version, but his technique was my home base.

IMG_1566 2

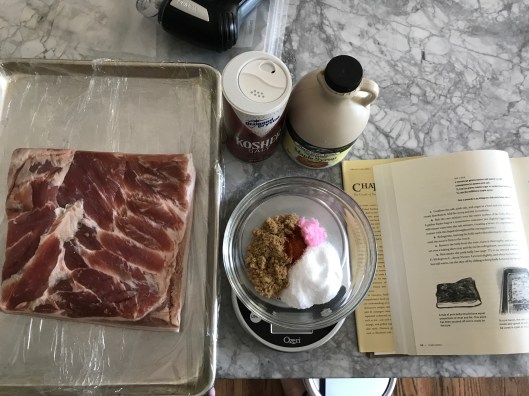
I combined the sugar, salt, nitrate, brown sugar, cayenne, black pepper and maple syrup, then just slather on the pork belly. Put it in a bag and wait seven days for the cure to fully penetrate the meat (flipping once a day.)

For some versions, I used sorghum syrup (similar to molasses) and varied the amount of spice via red pepper flakes and cayenne. The sorghum definitely added a deeper flavor and color, it was a nice variant, but I’m partial to the maple flavor.

​

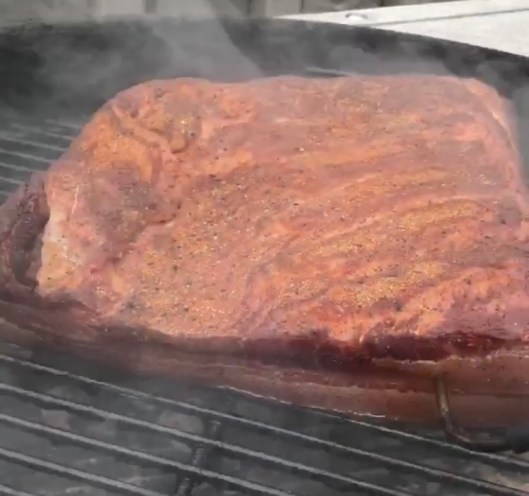
In the first version I made, I just stuck the belly on the smoker after curing, but it didn’t have enough extra oomph on the outside. For subsequent versions, I sprinkled raw sugar, cayenne and black pepper on the pork belly before smoking.

So pretty, right!?!?

Then you smoke for three hours at 225 degrees or until the internal temp hits 150 degrees. (I took the skin off after smoking and froze it to use later for greens or soups.) I used applewood chunks for a mild, fruit smoke flavor.

img_8379

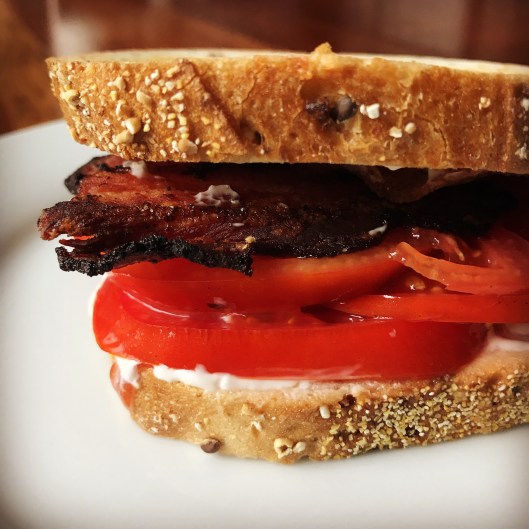
Then slice and cook! I recommend baking the sliced bacon so the sugar doesn’t brown too fast, and if you need to crisp it up, you can throw it in a sautè pan at the end to finish it.

Tip for slicing: freeze for five or ten minutes before slicing if you would like thinner slices.

Second: Results!

img_8568-1

It’s so good, y’all. And honestly straight-forward to do once you have the ingredients. You should be able to get pork belly at your grocery (you may need to request it) or local butcher shop. If not, it can be ordered online.

The payoff is worth it.

img_8516-1


Easy Peasy Pita

21 Friday Apr 2017

Posted by AllOutOfForks in bread, Dinner, Recipes

≈ 1 Comment

Tags

pita bread

Time to see how much making pita bread is! AND I actually remembered to take pictures throughout the process for you. 😉

The recipe I followed for this post was the Serious Eats: Perfect Homemade Pita Bread recipe.

First you add all of the ingredients to your mixer or your food processor (in the processor, I would add the dry ingredients first (pulse) and then add the wet ones.) Or you can do this with just a wooden spoon (like the recipe above.) I really like the combo of the white and wheat flour, but you can use what you have on hand.

Once it comes together, keep the machine going for a couple minutes to “knead” it. Then place the dough in a lightly oiled bowl.

Let rise for an hour or two. I like to put my oven on its lowest setting, and then turn it off before putting the covered bowl in there to rise. It gets nice and puffy. At this point, I put my griddle in the oven and preheat to 500 degrees.

I then separated into fairly equal balls – I weighed the dough and divided by 3 ounces (for each ball.) Cover the balls of dough with a kitchen towel and let them rest.


Then I roll each ball out to a circle. The dough bounces back a little bit, but try and get it pretty thin. Then cover the circles with the towel so that they don’t dry out.

Throwing the circles on the griddle can be a little tricky, but the ugly pita tastes just as good as the pretty pita. Most of them will puff up nicely and give you a lovely pocket for your sandwiches.

Flip and let brown for a couple seconds, and then take out and place with the rest – wrapped in a towel.

So pretty, and they really are delicious. Since they do not have any preservatives, keep them in the fridge if you still have some left after a couple days. You could probably freeze them as well. Happy Pita making!

Short Ribs Experiment!

15 Wednesday Mar 2017

Posted by AllOutOfForks in Dinner, Recipes

≈ Leave a comment

Tags

Beef, braise, comfort food, short ribs, sous vide

Per usual, I bought an unfamiliar ingredient and picked out the perfect recipe without reading it through. Short ribs were on sale and they were going to happen, whether the fam wanted them or not.

The recipe I wanted to try was Tom Colicchio’s lovely wine-marinated, slow-braised short ribs (which required marinating overnight in a bath of red wine, herbs and aromatics). Next thought…why not use the sous vide?? Welp, that short ribs recipe instructed a 48(!) hour cook in 180 degree water.

Aha moment! I can cook the ribs sous vide all day in the marinade and then do 1.5 hour braise just in time for dinner. Right? (Here goes nothing.)


First, I seared the ribs at high heat, took them out of the pan, and added the veggies and garlic in the pan. Second, I added a bottle (do it big) of Pinot noir to reduce with the veggies and with added sprigs of thyme.

(In the meantime, I set up the sous vide to preheat to 180 degrees – this takes a good bit of time so I heated up water in the tea kettle – to add to the water bath and speed up the water-heating process.)

I retrieved some chicken stock from the freezer and added it to the wine reduction (now cooling). Then added the ribs to the plastic bag with the wine marinade/cooking liquid, and vacuum-sealed the bag. Once the sous vide was preheated, I added the bag of yumminess and left it in there to cook for 6 hours.

After that, I poured all of the contents in a Dutch oven and put it into a 350 degree oven with the lid ajar for an hour and a half. I grilled the ribs before serving, and reduced the liquid, simmering in the pot, while the ribs were getting roasty and charred on the edges.

The ribs were not “fall apart” tender but were seriously delicious. The leftovers were kept in the liquid for dinner on Monday, and I just poured them in a pan to heat up and further reduce for dinner time.

Oh my.

(WARNING: DO NOT CLICK TO SEE A LARGER VERSION OF THE ABOVE PHOTO. MAY CAUSE DROOLING AND LOSS OF BREATH.)

The combo of Chef Colicchio’s marinade and the combo sous vide/braising cooking technique really paid off. I essentially took a three-day process between the two recipes and shrunk it down to eight hours, with a quality reheat the next day.

I served them over rice, but mashed potatoes or buttered egg noodles would be divine.

A Galette by any other name… (Spoiler! It’s pie 😁)

09 Thursday Mar 2017

Posted by AllOutOfForks in Recipes

≈ Leave a comment

Does making pie crust from scratch seem daunting? Do pies seem like something just grandmas and competitive soccer moms do?

No! You deserve fresh strawberries glazed in sugar and encased in a flaky, buttery blanket. It can all be yours! (Just with a lot less work than you THINK it will take.)

Living in Florida has many benefits, but the early fruit and other fresh produce is something that is really invaluable. Seeing these beauties inspired me to make a Strawberry Galette for a brunch gathering this weekend. (And galette just means pie, but without the fussy crust.)


Keep in mind that you can buy pie crust from the store, and this would be lovely. But being the slightly overwrought food nerd that I am, I wanted to make the crust myself. I used Smitten Kitchen’s Berry Galette crust and loosely adapted the filling part.

I diced Kerrygold butter and put it in the fridge to chill while I got out the other ingredients. I didn’t have ricotta so I used sour cream. I also have about 25 different salts, so I used a fine grey French salt (close to Fleur de Sel but less expensive).

I find in baking that going a little higher end on key ingredients like butter, vanilla and salt transform something good into something spectacular. (My Toll House chocolate chip cookies have stunned people, not kidding.)

After cutting the cold butter with a pastry cutter into the dry ingredients, you gently fold in cold water and sour cream with a spatula or wood spoon (or your hands!) to make a craggy, ugly ball. Then wrap it in plastic and flatten into a disk. Put it in the fridge for at least an hour and you can use that time to make the filling.

Another tweak I made: I cut up one container of the strawberries and cooked them down with a 1/2 cup of sugar (they were really tart), lemon zest, the cornstarch and a splash of Madagascar vanilla. (Instead of just tossing the uncooked fruit with the other filling ingredients as the original recipe instructs.)


While those strawberries cooled, I sliced about 10 more strawberries and rolled out the crust on parchment paper. I drained some of the cooked strawberries (about a 1/4 cup of juice) and microwaved the resulting strawberry juice with about four tablespoons of sugar to make a glaze. ( I just added sugar until it tasted like a strawberry syrup to be honest.)

The cooked strawberry mush (basically jam) went on the crust first, leaving 2 inches around the edge. Then the raw strawberry slices were added on top in a spiral until covering the fruit. Lastly, I folded the crust over, and glazed the fruit. Last step is brushing the crust with egg wash and sprinkling heavily with sugar (coarse sugar would have worked better, but I was out. )

Bake at 400 degrees for 30 minutes or golden brown.


Look at this monster! This thing smelled like sunshine, Springtime and grandma’s kitchen all wrapped up in one. The parchment paper was a lifesaver, both in the dough rolling process (had to stick it in the fridge when the butter started getting to warm and the crust became unmanageable) and in transferring the finished galette to a serving plate.

She’s so pretty!

Two notes after finishing this little beaut: 1) definitely double or triple the recipe. One of these could serve 4-6 people at most (depending on how small your slices are and how hungry your guests are) and you definitely want leftovers; 2) taste the strawberries to determine how much sugar you need. These strawberries were hella tart and needed A LOT more sugar than the recipe recommended, and it still wasn’t a “sweet” pie.

You can probably tell by the picture, but the crust was sublime, both flaky and tender. Reminded me of a pie crust with smidge of biscuit in buttery texture. This is perfect for dessert, brunch, breakfast or just to celebrate fresh strawberries. (Serve with your favorite vanilla ice cream.)

RECIPE: Berry Galette by Smitten Kitchen

Lechon, My Lechon

06 Monday Mar 2017

Posted by AllOutOfForks in Dinner, Recipes

≈ Leave a comment

Tags

beans, cuban, lechon, pork, roast

I love books of all kinds, but cookbooks and YA badass heroines are my weaknesses. Getting a new cookbook and reading it from cover to cover is always a delight. I got The Cuban Table awhile ago, but kept putting off committing to a recipe.

I can’t remember what triggered my need for Cuban food, but this pork roast instantly called to me when I was looking for a good Sunday dinner. (Cautionary tale: I skimmed the recipe and didn’t notice the overnight marination until too late…so it became a Monday dinner .)

The marinade is straightforward, but I wanted to make it a little easier so I used storebought Mojo and doctored it with the juice of one blood orange. You can substitute half orange juice/half lime juice for the blood orange, but they are becoming more common at the grocery store. (These oranges have a beautiful red interior and contribute color as well as flavor.) Made the prep very simple.

bloodorange
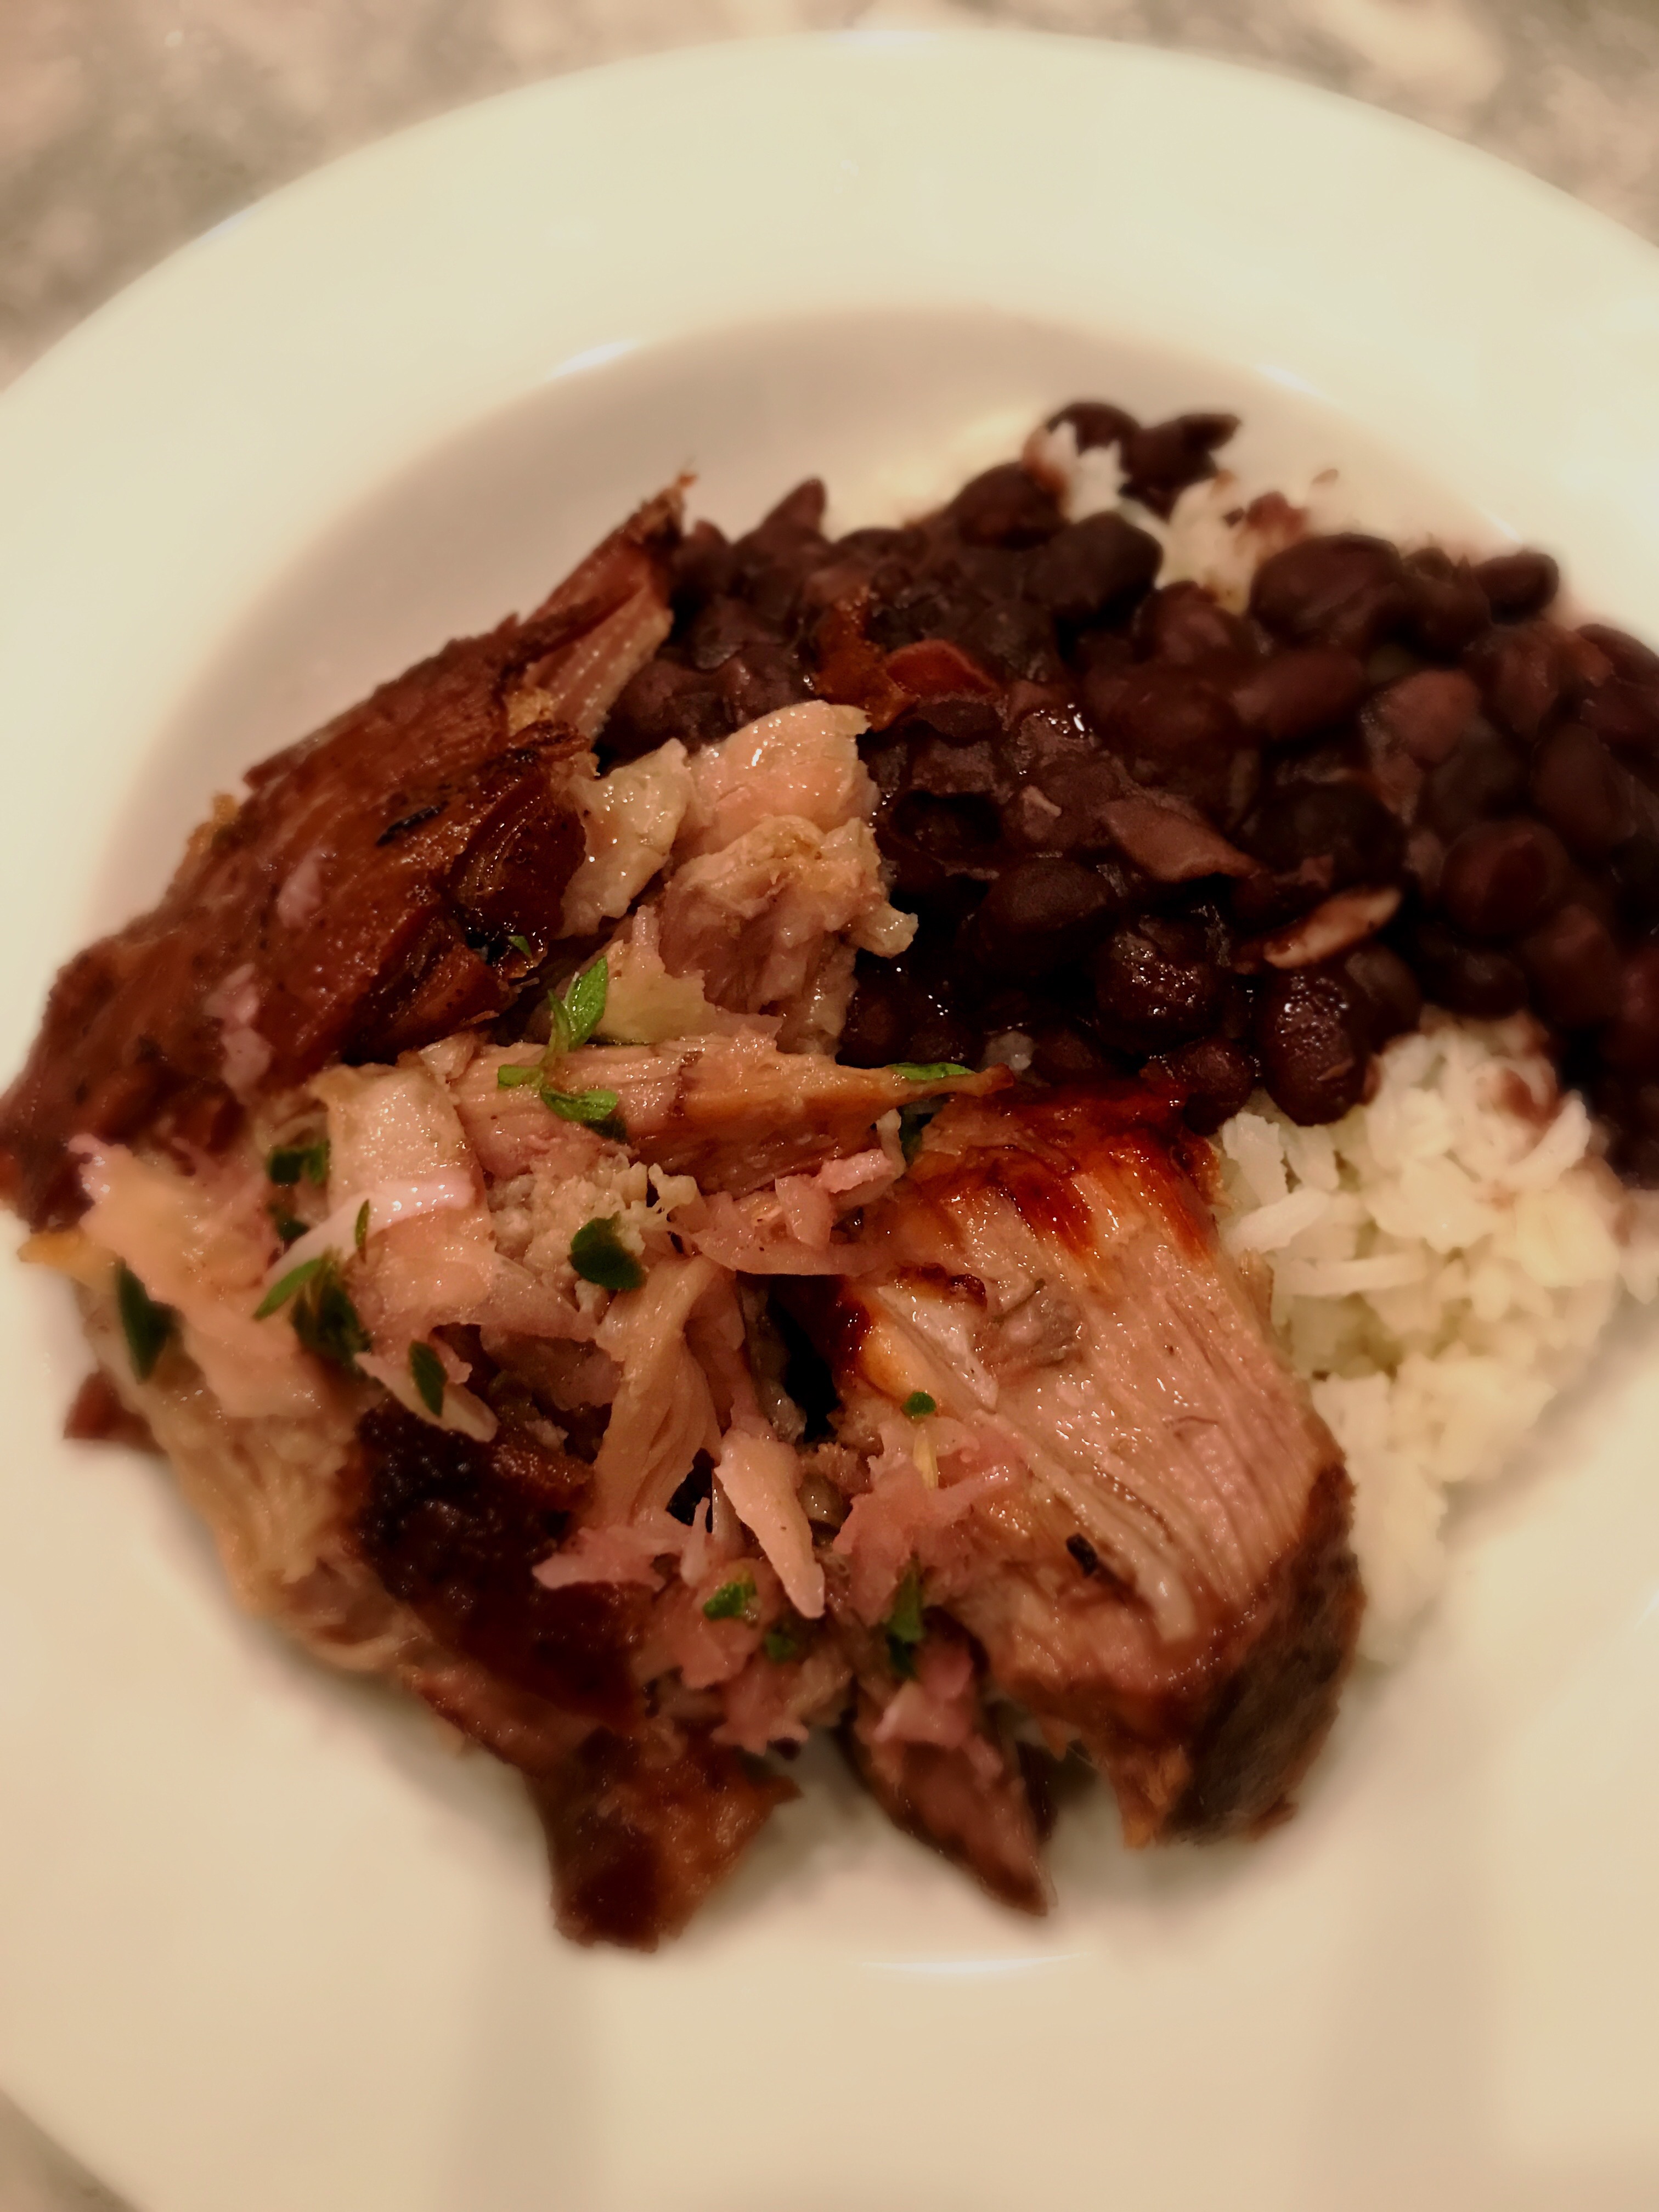
Monday morning, I drained the pork butt, placed it in the Dutch Oven, and put it in a 250 degree oven, and left for work (about 8 a.m.)

(For those concerned about leaving the oven on unattended, here is a detailed article on the pros and cons.)

The reveal at 6 p.m. was pretty impressive and my house smelled like citrusy porky goodness. I took of the lid and broiled the roast, which resulted in a gorgeous crackly crust on the top. I really wish I could share the smell with you. Drool!

The bone came right out, the meat was succulent and silky, the crispy top added the perfect crunch to balance the meat.

The absolute icing on the cake was the Mojo Criolla, which I made as suggested as the finishing sauce.

Fresh oregano, orange/lime/blood orange juice and garlic are combined, and then separately, lard heated up. It is very dramatic as you pour the hot lard into the juice mixture with lots of popping and bubbling as it cooks the garlic and oregano.

My black bean recipe starts by sautéeing onions, carrots and garlic, then adding two cans of rinsed black beans and enough stock to almost cover, simmer for an hour. I also like to reserve some diced onions and place them in a little lime juice to use as a topping for my beans.

This recipe was relatively simple, but really delicious. And I was lucky that blood oranges were available, they added a nice sweet/sour flavor and color.

This entire cookbook is gorgeous, and after the success of this Lechon Asado, I am looking forward to diving into the rest of the recipes.

The Cuban Table by Ana Sofia Pelaez; Photography by Ellen Silverman

Image

Creamy Broccoli And Cauliflower Soup

07 Thursday Mar 2013

Tags

broccoli, cauliflower, soup

20130117-102505.jpg

In an attempt to get eat more healthy, but still retaining the comforting nature of a cream-based soup. This winter, I came up with a broccoli soup recipe that primarily used steamed cauliflower to make the soup more sumptious.

I steamed a “bunch” of broccoli (two or three heads in the package from Publix) and a half a head of cauliflower. I did a rough separation of the florets and placed in a covered bowl in the microwave for five minutes with a couple tablespoons of water.

While those were steaming, I sauteed a vidalia onion in a tablespoon of oil until translucent and then added a couple small cloves of garlic, roughly chopped. I then added salt and pepper and a sprinkling of flour (which can be omitted if you wanted to have a gluten free/paleo recipe). I cooked the flour for a minute while stirring and then added a quart of chicken stock (there is a great new product by Swanson’s). You could use homemade stock or even use water with chicken boullion, depending what you have on hand. Bring to a light bubble.

I added the steamed veggies to the liquid and let it cook down for about 10 minutes. I wanted everything to be super tender. After the simmering, I got out my stick blender and blended to a nice creamy consistency without making it a puree. This makes a pretty thick soup, so you could add more stock depending on your taste. Make sure to salt and pepper along the way…makes a big difference.

To finish, I added juice from a half a lemon and some lemon zest. (You could also use a splash of white wine vinegar or sherry.) This adds a nice zing to balance the creaminess.

Options: Depending on how healthy you want to make it, you can add a glug of cream or garnish with cheddar cheese, but it tastes good without it. We also used some gourmet Crispy Onions from Fresh Market once and that was delicious.

Let me know if you try this out. But I ended up eating this in a couple different variations for a couple weeks. Also an especially great lunch option at the office.

20130117-102512.jpg

Posted by AllOutOfForks | Filed under Recipes

≈ Leave a comment

Hi, Okra. I love you.

11 Tuesday Sep 2012

Posted by AllOutOfForks in Dinner, Recipes

≈ 3 Comments

Tags

okra, orchard pond organics

20120911-113249.jpg

Okra is not the prettiest vegetable, but it is sooo good. I grew up eating fried okra, where I would eat each batch as fast as my Mom could make it. Flour, salt, okra and some oil – and you are done!

I love the different shapes and colors that okra can have. I was pleasantly surprised to find some Crimson Okra in my CSA bag from Orchard Pond Organics, in addition to the more common Green Okra.

B (the almost 10-year-old) thought the red okra was a little sweeter that the green. I thought they tasted about the same.

I heat up a couple of inches of oil at med-high heat. To test to see if it is hot enough, I put the handle of a wooden spoon in – if the oil reacts with lots of bubbles, it is too hot; if there is a steady stream of bubbles, then it should be about 350 degrees.

I like to put the flour, salt and sliced okra in a Ziploc, and then pour the okra in to a colander (either in the sink or in a grocery bag) to shake off the excess flour. I fry the okra in batches, using the colander to pour the okra in the oil. (FYI: Oil burns are painful, and create lovely blisters. Ouch.)

Just fry the okra until crispy and spoon out onto a paper towels. IMMEDIATELY SALT OKRA. It sticks better and flavors the okra more thoroughly.

Oooo..here they are. Just amazing little crispy gems.

Bonus photo with B’s fingers eating MY OKRA.

Now, I also like okra sliced and added to veggie saute (squash, onion, garlic and any other veg in the fridge), as well as roasted whole, but fried is just so good.

How do you like your okra?

Lemon Caper Salmon Burgers with Herb Aioli

04 Tuesday Sep 2012

Posted by AllOutOfForks in Dinner, Recipes

≈ Leave a comment

What to do with extra salmon? That was my quandary this weekend after doing my go-to salmon recipe (soak in balsamic vinegar/soy sauce for 30 min, pat dry and add salt/pepper/brown sugar before saute – awesome and simple) for dinner yesterday and having extra. And we had wonderful mashed potatoes with it, but of course forgot to take a photo.

So on to tonight, I was thinking that salmon burgers would be something different, and after tooling around various recipe sites, I figured I could wing it.

Well, my experiment was not mind-blowing, but still was a big improvement on most that I have had in restaurants. I decided to do a fine chop instead of using the food processor (or canned salmon, um no.) I mixed the salmon with lemon zest, a little white onion (fine dice), diced capers, mayo, S/P and mashed potatoes for the binder.

As many of you know, I feel like the bread is a big deal for a good burger or sandwich. I had the hub pick up fresh bakery hamburger rolls, which were toasted and buttered. (Of course.) Served with romaine, and Stonewall Kitchen lemon herb aioli from Fresh Market, this was a solid effort. I think I need to add a little more binder next time (or use a thinner spatula) as two out of the three patties were difficult to turn without a little disassembly, but still very yummy.

The patties themselves were very flavorful, I loved all of the crispy edges on the little chunks of salmon. I also really liked the texture of the mashed potatoes as the binder. I’m thinking adding a tablespoon of panko next time and maybe an egg white will help with the structure, but I would hate to modify the texture too much. So B+ effort, but will report back when I make these again. Also, the 9-year-old inhaled hers, so I’m thinking it wasn’t too bad. 😉

Do you have a go-to salmon recipe? I would love to hear about it…

Image

Pasta Alla Carbonara

13 Monday Aug 2012

Tags

carbonara, pasta

I was lucky to spend my last semester at Florida State University abroad in Florence, Italy. It was an amazing (hot!) summer where I first discovered wine I liked and was seriously overwhelmed by good food. When I got home to Tallahassee, I learned how to cook all of my favorite dishes from Italy, and my passion for good food and cooking took off from there – learning to cook all of my favorite things from my childhood and beyond.

The two of the first dishes that made an impression were Risotto Milanese (ridic!) and Pasta alla Carbonara. Carbonara looks complicated, but comes together very quickly and is a luxurious sauce that is seriously addictive. Pancetta seems like an exotic ingredient but it is simply uncured Italian bacon. It is definitely worth seeking out at the grocery deli counter or Italian specialty store.

Via Wikipedia: As the name is derived from carbonaro (the Italian word for charcoal burner), some believe the dish was first made as a hearty meal for Italian charcoal workers.

Pasta alla Carbonara

This recipe came from Cooking with Love, Italian Style by Francis Anthony

12 ounces spaghettini, spaghetti or linguine
5 ounces pancetta (available at the deli counter at Publix)
1 tablespoon olive oil
2 jumbo eggs (I used large and it was fine), coddled (I put them in with the boiling pasta for a couple of minutes and removed to cool – this step is only if raw eggs make you nervous)
4 ounces Romano or Parmigiano cheese
Freshly ground pepper to taste
2 tablespoons butter

Serves 4 to 6 as an appetizer or 2 to 4 as a main course

Begin cooking the pasta (per the instructions on the box) in salted water. Meanwhile, in a large skillet, saute the pancetta in the olive oil until crisp (you can omit the olive oil and let it crisp in its rendered fat). Remove the crispy pancetta with a slotted spoon and set aside. Discard all but 2 tablespoons of the rendered fat in the skillet and set aside.

In a bowl, combine the eggs, cheese, and pepper and mix well. Set aside 2 tablespoons of the pasta cooking water, then drain pasta. Quickly toss the pasta with the butter, then add the egg mixture and toss.

Transfer the pasta to the skillet with the reserved pancetta fat and quickly saute it until the egg mixture has adhered, adding the pasta water. Sprinkle the reserved pancetta over the finished pasta and serve immediately.

Posted by AllOutOfForks | Filed under Dinner, Recipes

≈ Leave a comment

Enter your email address to follow this blog and receive notifications of new posts by email.

All Out Of Forks

  • Glasses, pickles, salad dressing shaker/container, vase, prep, and more! twitter.com/_drazzari/stat… 2 months ago
  • Ouch twitter.com/rinnyriot/stat… 3 months ago
  • The fact is that lion’s mane mushrooms are amazing and this technique is probably delicious but just don’t call it… twitter.com/i/web/status/1… 3 months ago
  • Was craving some halal cart-style chicken and rice. Necessary comfort food. #casualdinner #noplating https://t.co/ogU9Raweep 3 months ago
  • Perfect example of trash stunt food. #waste twitter.com/thesavoyshow/s… 5 months ago
Follow @AllOutOfForks

Categories

  • bread
  • Breakfast
  • Cocktails
  • Dinner
  • Food Porn Friday
  • Food Truck
  • LOL
  • Lunch
  • meat
  • Miscellaneous
  • Recipes
  • Review

Archives

  • July 2020
  • February 2019
  • May 2018
  • October 2017
  • September 2017
  • April 2017
  • March 2017
  • February 2017
  • January 2017
  • December 2016
  • April 2014
  • December 2013
  • November 2013
  • October 2013
  • September 2013
  • August 2013
  • July 2013
  • May 2013
  • April 2013
  • March 2013
  • February 2013
  • January 2013
  • December 2012
  • November 2012
  • October 2012
  • September 2012
  • August 2012
  • January 2012

Create a website or blog at WordPress.com

  • Follow Following
    • All Out of Forks
    • Join 38 other followers
    • Already have a WordPress.com account? Log in now.
    • All Out of Forks
    • Customize
    • Follow Following
    • Sign up
    • Log in
    • Report this content
    • View site in Reader
    • Manage subscriptions
    • Collapse this bar
 

Loading Comments...